
Welcome
Add monday.com to your Outlook inbox in under five minutes.
Turn emails into item updates, edit board columns from the message pane, create CRM leads from a sender's address, file service tickets from a support thread — every monday workflow lives in the same Outlook add-in, with Work Management, Sales CRM, and monday Service side-by-side in tabs (whichever your account has enabled). This guide walks through installation, the everyday moves, and the small details that aren't obvious. For release notes, see What's new.
Section 1
Getting started
Install the add-in, connect your monday account, and pin your first item — three steps.
1.1 Install the add-in
The add-in is published as monday.com for Outlook. You install it from inside Outlook itself — there are two ways, depending on your Outlook version.
Option A · Apps panel (new Outlook & Outlook on the web)
- Click the Apps icon in the side rail — the small four-squares-in-a-square mark, sometimes labelled More apps.
- Search for monday.com for Outlook.
- Click the result and install it.
Option B · File menu (classic Outlook desktop)
- Open File → Manage Add-ins. A web view opens.
- Search for monday.com for Outlook.
- Click the result and install it.
Once installed, open any email (read or compose) and click the monday.com icon in the message toolbar.
1.2 Sign in to monday.com
- The first time you open the add-in, you'll be prompted to Connect to monday.
- A pop-up window asks for your monday.com login. Sign in with the same account that owns the boards you want to use, then authorize the requested permissions when monday asks — without that, the add-in can't read your boards.
- Pay attention to which user and which monday account you're signing in with. The active account name is shown at the top-right of the connection pop-up. Everything you'll see in the add-in (boards, products, role) follows that user — sign in with the wrong one and your boards may simply not appear.
- If sign-in hangs or fails on desktop Outlook, try connecting from Outlook on the web instead.
1.3 Pin your first item
The current working item is the item the add-in is showing you right now. It's automatically remembered across sessions, and four different things can set it:
- Pick it manually from the add-in's Work Management view (board → group → item).
- Open an email that contains the item's unique email address in To, Cc, Bcc, or the body — the add-in detects it and loads the item.
- Open an email related to the item — for example, a notification email when you've been mentioned in an update on monday.
- One-click button on monday via the integration recipe "When a Button is clicked, set this item as the current working item in Outlook." Click the button on any item, then open the add-in.
To add the button recipe in monday: open the board → Integrate → Create → search Outlook Integration → add the recipe.
Section 2
The basics
Five things this add-in does well.
- Set the current item from monday — one click in monday opens that item in Outlook.
- Add updates from email — an email's subject, body and attachments become an item update.
- Edit columns from your inbox — open the Item Card to change Status, Date, People, and more.
- Create new boards, groups, items and subitems without leaving Outlook.
- Star your favorites — boards, groups, items and subitems you use most stay one tap away.
Section 3
Email → monday workflows
The day-to-day moves: turn an email into an update, a forward into a record, a reply into a conversation log.
3.1 Add item to To / Cc / Bcc
- Pick To, Cc or Bcc from the "Add item to…" button. Hit Send. monday creates an update on the selected item with the email's subject, body and attachments.
- As long as the item's email address stays in the conversation, future replies on the same thread are added as additional updates automatically.
- Default recipient type is configurable in the add-in's Settings.
3.2 Forward mail as update
A direct way to push the entire conversation — not just the last message — into a single update on the selected item, taken straight from the email body you're currently viewing. No new email is sent.
- Use it when you want to archive a whole thread on monday in one click.
- Use Add item to To / Cc / Bcc instead when the conversation is still going and each future reply should keep landing on the same item.
3.3 Conversation Link
Get a deep link to the original Outlook conversation as a clickable column on the monday item.
- Add the deep-link integration recipe in monday: "When an update is created, add conversation to link column", and connect it to the link column on your board.
- When the Conversation Link setting is on, sending an update from the add-in (via Add item to To/Cc/Bcc, or Forward mail as update) appends the link below your email signature and writes it into that link column on monday.
- You can then re-open and reply to the conversation directly from monday.
3.4 What gets recorded, and who can see it
Email content sent through the add-in is recorded on monday in two places:
- Item updates — the conversation thread on the item.
- Emails & Activities timeline — when the E&A widget is on the board.
Visibility follows standard monday permissions: any user with access to the item and the relevant section sees the content, and attachments follow the same rules. Conversation links are private — only the user who sent the email can open them.
Section 4
Updates & collaboration
Working in the Updates tab without ever sending an email.
4.1 Write updates without sending an email
Open the Updates tab inside the add-in to post directly to the current item. No email needed.
4.2 Tag people in updates
Type @ to mention any monday user in an update. They get a notification just like a native monday mention.
4.3 Open update in monday
Each update has an Open in monday link that jumps straight to the conversation on monday.com — useful for replying with rich formatting or attachments larger than email.
4.4 People tab
The People tab lists everyone connected to the current item — useful for adding the right recipients without searching for addresses.
- While composing an email: one click adds a person to To, Cc, or Bcc.
- While reading (not composing): click Send Email next to a person to open a new draft already addressed to them.
The list is built automatically from:
- monday.com item subscribers (shown first)
- Email and Text columns on the item
- Item updates and replies
Duplicates are filtered out so the same person doesn't appear twice.
Section 5
Item card & columns
Everything you can change about an item without leaving Outlook.
5.1 Opening the item card
Inside any item, click View item card to see and edit columns inline. Subitems work the same way. Changes save to monday automatically — there's no save button.
5.2 Filter & hide columns on the item card
Long boards have many columns. Use the column filter on the item card to show only what matters and hide the rest. Your selection sticks per-board.
5.3 Supported column types
The add-in can read and write the column types supported by the monday.com API. The most common ones used from Outlook:
Status
Pick from existing labels, or create a new label inline from the dropdown.
Date
Pick a date directly, clear it, or use the X-Days-from-now shortcut. The shift value and first day of the week are configured in Settings.
Timeline
Pick a start date and an end date.
Numbers
Type a value or clear it.
People
Add users or teams to the column from the board's membership.
Text / Long text
Type a value, also usable as a filter target in Advanced Item Filtering.
Files
Three ways to fill it: drag-and-drop files between file columns, upload from your computer, or upload attachments straight from the email you're currently reading.
Connect Boards
Link an existing item from a connected board, or create a new linked item directly from the column.
Item ID
Read-only. The ID is searchable from the add-in's search box.
monday Doc
Open the linked document on monday in a new tab.
Formula
Read-only — values are calculated by monday.
Email (item address)
The item's unique email address. Choose its display name in Settings.
Section 6
Finding & filtering items
When the right item isn't where you expect.
6.1 Search by board, group, item, subitem or ID
Type any name or ID into the search box. Hover an item to see its monday ID as a tooltip.
6.2 Search across all groups
If your item isn't in the current group, toggle Search across all groups. The toggle is remembered per board.
6.3 Advanced item filtering
Filter the visible items by Status, Date, Person or Text column values. Combine filters; the toggle for current-group vs. whole-board scope sits next to the filter button.
Section 7
Emails & Activities
Log every email, call, and custom activity straight from your inbox.
What this view does
See a board's Emails & Activities widget right inside the add-in — same conversations and calls log you'd see on monday.
Logging activities & custom activities
Send an Email & Activity entry with a Custom Activity type from the toolbar. Pick the activity type in Settings; useful when "Email" isn't the right label for what you're tracking.
Adding emails to E&A from Sales CRM
In a Sales CRM lead or contact, an email you're reading can be added directly to the contact's Emails & Activities log.
Section 8
Sales CRM
 Sales CRM
Create and manage Leads, Contacts and Accounts directly from Outlook — no tab switching.
8.1 Connect your Lead, Contact and Account boards
- Open the add-in's Settings and go to the CRM section.
- Connect the Leads board, Contacts board, and (optionally) the Accounts board. You can connect just Leads, just Contacts, or both — you're not required to pick both.
- Choose the group inside each board where new entries land.
8.2 Choose your Lead/Contact columns
Pick which columns map to Name, Email, Company, etc. The add-in remembers your choice per board.
8.3 Add leads & contacts from email
- Open an email and use Add as lead/contact. Name, email and company are filled automatically from the message.
- Select recipients from the To/Cc list directly — no copy-paste.
8.4 Custom fields
Map custom monday columns onto the Lead/Contact form so they're filled in at creation time, not later. Configured under Settings → CRM.
8.5 Edit, view, and jump to monday
Open the View Item Card directly from a lead or contact, or jump straight to the record on monday.com.
8.6 Send email content to update
The whole email — or just the body — can be sent as an update on the lead or contact.
Section 9
monday Service
 monday Service
Turn an email into a service ticket. Triage and manage open tickets without context-switching.
- Open the add-in's Settings and connect your monday Service board there — same flow as Sales CRM.
- Create new service tickets from an email. Title, requester and description are pre-populated from the message.
- View and manage open tickets without leaving the add-in.
Section 10
Personalization
Tune the add-in to your habits. Open the Settings (gear ⚙) icon inside the add-in to find everything below.
Inside Settings you'll find four groups — General, Work Management, CRM, and Service — each holding the configuration for that part of the add-in. The most useful things you can do from there:
- Switch between light, dark, or follow-Outlook themes.
- Pick the date format (DD/MM/YYYY or MM/DD/YYYY) used everywhere in the app.
- Choose the default tab the add-in opens on (Work Management, Sales CRM, monday Service — or hide CRM/Service entirely if you don't use them).
- Set the default "Add item to…" recipient — To, Cc, Bcc, or Forward mail as update.
- Toggle the Conversation Link behavior — whether the deep link is appended below your signature when sending.
- Choose how the item's email address displays in the recipients (off, item name, or a custom short label).
- Define the X-Days-from-now shift value used by the date shortcut button.
- Pick the first day of the week for Date and Timeline columns.
- Connect your CRM Lead, Contact, and Account boards and column mappings.
- Connect your monday Service board (if you have access).
- Pick a custom activity type for Emails & Activities entries.
- Upload your company logo to brand the add-in's footer (recommended size 150 × 50 px, PNG or JPG).
Section 11
Mobile
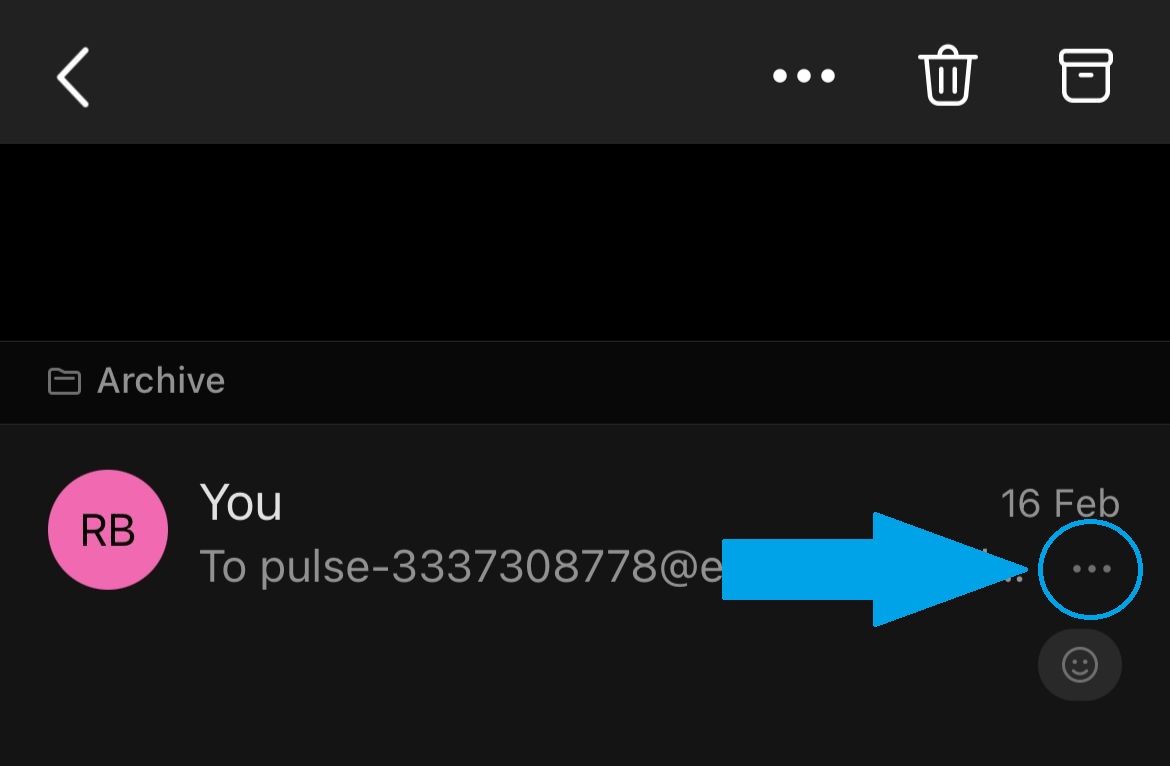
The add-in works inside the Outlook mobile app on iOS and Android.
- Open a message in the Outlook app on your phone.
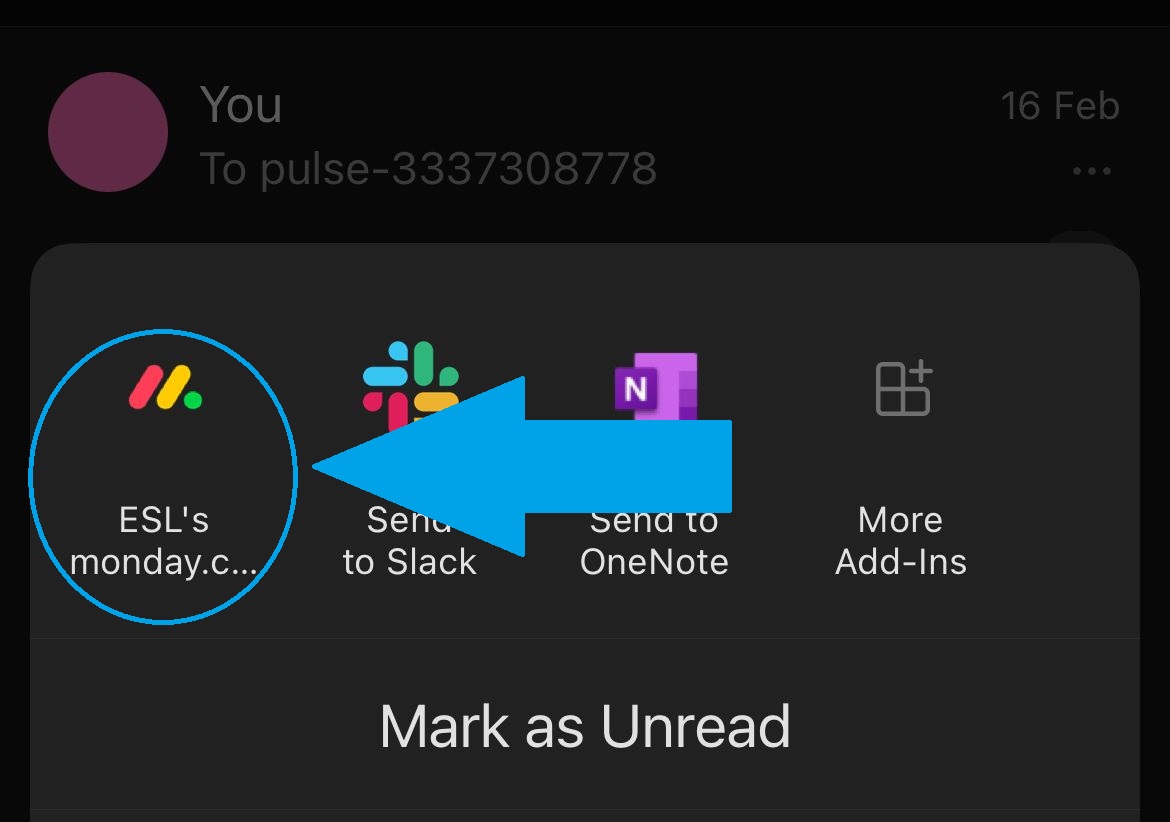
- Tap the three-dot (⋯) menu on the right side of the message.
- Tap monday.com for Outlook to open the add-in.
Section 12
Licensing & purchases
Free trial, account-wide plans, and per-user license assignment — all managed inside monday.com.
12.1 Free trial
Every monday account gets a two-week free trial on first install. After the trial, an active license is required to keep using the add-in.
12.2 Buy through monday.com
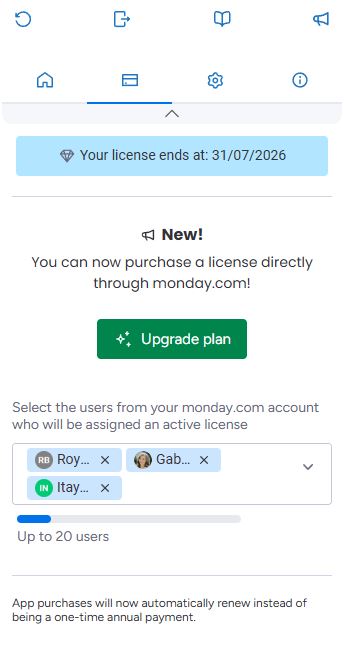
- Open the Purchase tab inside the add-in. Pricing is based on the maximum number of licensed users on your account.
- All billing happens through monday.com's marketplace. Plans renew automatically (no annual expiry) and you can pick monthly or yearly billing.
- See monday.com marketplace pricing.
12.3 Assign & manage licenses
The User Management page (Purchase tab) lists every user on your account. Assign or revoke a license per user.
To change a plan, cancel, or download invoices, go to Administration → Apps → Outlook Integration → ⋯ → Billing on monday.com.
12.4 Which license is active?
The header shows whether your active license is Personal, Free Trial, or Account. If both a personal and an account license exist, the active one is highlighted.
To view full details: Purchase tab inside the add-in, or Administration → Apps → Outlook Integration → ⋯ → Billing on monday.com.
Section 13
Frequently asked questions
Quick answers to the questions that come up most.
What plans do you offer?
Pricing is based on the maximum number of user licenses required for your account. See marketplace pricing.
You pick a plan through monday.com, then assign licenses to specific users from the Purchase tab in the add-in.
How do I create a new item?
Click Create new item and give it a name. The new item lands in the group you have selected and becomes your current working item.
To use the email's subject as the item name, tick the Copy email's subject checkbox.
How do I get to frequent items via Favorites?
Click the grey star next to any board, group, item or subitem; when it turns gold it's marked as a favorite.
Favorites appear at the top the next time you open the add-in.
How do I update a monday item by email from Outlook?
Pick the board, group and item you want to update — directly from the add-in or via a button in monday.
Choose Bcc, Cc, or To from the Add item to… button. Finish your email and hit Send. monday is updated with the email's subject, body and attachments.
How do I update an item's column values from the add-in?
Click View item card on any item or subitem. You can edit every column the monday API supports for editing.
Click a field to open its picker — date, status, people, and so on.
How is my last state saved?
The last item you worked on is saved automatically and re-opened the next time you launch the add-in. You can change this behavior in Settings.
Is there a mobile version?
Yes — see the Mobile guide for the exact steps. Note that mobile is read-focused.
Does the add-in work in Outlook on the web?
Yes. Classic Outlook desktop, the new Outlook for Windows, Outlook for Mac, Outlook on the web, and Outlook mobile are all supported.
Can I connect multiple monday.com accounts?
You can connect to different monday.com accounts, but only one user/account can be connected at a time. To switch, click the Exit icon in the add-in's navigation bar and reconnect with the other account.
Does the add-in support shared inboxes?
Yes. You can use the add-in while working from a shared mailbox in Outlook.
Why can't I update a column from the add-in?
Two common reasons:
1. The column type isn't editable from Outlook. Only column types supported for editing by the monday.com API can be written from the add-in. Read-only types (like Formula) can be displayed but not changed.
2. Your monday user role doesn't have edit permission on that column or board. Confirm with the board owner that your role (ideally Admin or Member) has write access to the column. Viewer and Guest roles have very limited write access.
Can I work offline?
No. The add-in needs an internet connection to talk to monday.com.
I can't see my Sales CRM boards.
Make sure the Sales CRM product is enabled on your monday account and that your user is assigned Sales CRM access under Administration → Directory → Users → Products on monday.
Where do I see what's new?
The release notes page lists every shipped change.
Section 14
Troubleshooting
The most common issues, grouped by what's going wrong, with the exact fix for each.
14.1 Can't load the add-in
Your IT department may be blocking third-party Office add-ins for the whole organization. This is set in the Microsoft 365 admin centre, not by you. Ask your IT admin to allow monday.com for Outlook.
The add-in only shows when you're viewing a specific email — either reading one or composing/replying. From the inbox folder list with no message open, the icon won't appear. Select a message first.
In some Outlook builds the icon also lives inside the blue Apps button — click that to see all installed add-ins and pick monday.com from there.
Try opening the add-in from Outlook on the web. Desktop Outlook can hold stale add-in data and the web client behaves more reliably in many corporate networks.
On the monday side, make sure the app is up to date: Administration → Apps → Outlook Integration → ⋯ → Update.
14.2 Sign-in & connection
Try signing in via Outlook on the web first.
Verify the active monday account in the top-right of the connection pop-up matches the account that owns the boards you want to use.
Confirm your monday role is Admin or Member. Viewer and Guest can sign in, but most actions are limited.
Your monday.com auth token expired or was revoked, your user role changed (for example, from Member to Viewer), or there's an authorization issue on the account.
Re-open the add-in, sign in again, and double-check you're using the correct monday account and user. Reconnecting refreshes the token and resolves it in most cases.
This message can appear even when you hold an active personal license. Open the Purchase tab inside the add-in — if a Personal, Account, or Free Trial license is shown as active there, the warning is safe to ignore.
14.3 Missing boards or items
Most often this is a workspace-permission issue. The add-in only sees workspaces explicitly granted to it: open Administration → Apps → Outlook Integration → ⋯ → Permissions on monday and add the missing workspace.
Also confirm you're signed in with the right user. Use the Exit icon in the add-in's nav bar to switch users if needed.
Toggle Search across all groups — by default the add-in only searches the currently selected group.
Use Advanced Item Search to filter by status, date, person, or text columns, or by item / subitem ID.
14.4 Editing & sending emails
Only column types that the monday.com API supports for editing can be written from Outlook. Read-only types (Formula, for example) are visible but not editable.
If the type is supported but the update still fails, your monday role doesn't have permission to edit that column on that board. Ask the board owner to grant edit access. See the FAQ entry on column updates.
Very long conversations can hit the platform's character limit and be truncated. Send only the relevant portion, or use Add item to To / Cc / Bcc on a fresh email so the thread stays linked to the item without one giant payload.
This is by design — the mobile add-in is read-focused. View items, browse boards, and update column values from your phone; compose-mode flows (drag-and-drop file uploads, attaching the email subject/body to an item) live on desktop and Outlook Web.
Section 15
Need more help
We're a small team and we read every email.